How to Clean a Keyboard: Quick and Easy Methods
Maintaining a clean keyboard is crucial for both hygiene and functionality. Over time, dust, crumbs, and other debris can accumulate between the keys, leading to sticky keys and unresponsive typing. Knowing how to clean a keyboard can extend its lifespan and improve your typing experience. In this guide, we will provide you with quick and easy methods to clean your keyboard effectively. These steps are simple and can be done with common household items, making it easy for you to keep your keyboard in top condition without any hassle. Follow these instructions to ensure your keyboard remains clean and fully functional.

Why Clean Your Keyboard?
There are several important reasons to clean your keyboard regularly. Firstly, it helps in maintaining a hygienic workspace. Keyboards can harbor bacteria and germs, especially if you frequently eat or drink at your desk. Regular cleaning can prevent the spread of germs and keep you healthy. Secondly, cleaning your keyboard ensures that it functions smoothly. Dust and debris can cause keys to stick or fail to register, which can be frustrating and reduce productivity. Lastly, a clean keyboard enhances your overall user experience by keeping your workspace tidy and pleasant. By understanding the importance of a clean keyboard, you can see why it is worth taking a few minutes to clean it regularly.
What Tools Do You Need?
To clean your keyboard effectively, you will need a few essential tools. These include a can of compressed air, a soft-bristled brush, microfiber cloths, isopropyl alcohol, cotton swabs, and a small vacuum cleaner with a brush attachment. Compressed air is great for blowing out dust and debris from hard-to-reach areas. A soft-bristled brush helps to gently sweep away particles without scratching the surface. Microfiber cloths are perfect for wiping down surfaces without leaving lint behind. Isopropyl alcohol is effective for disinfecting and cleaning without damaging the keyboard. Cotton swabs are useful for cleaning small crevices, and a vacuum cleaner with a brush attachment can help to remove larger debris. Having these tools on hand will make the cleaning process easier and more efficient.
How to Clean a Keyboard: Step-by-Step
Step 1: Preparing Your Keyboard
Before you start cleaning, turn off your keyboard or unplug it from your computer to prevent any accidental key presses or electrical issues. If your keyboard is detachable, remove it from your computer. Place the keyboard on a clean, flat surface and gather all your cleaning tools. It’s important to have everything ready before you begin to ensure a smooth and efficient cleaning process. Having a well-prepared workspace will help you avoid any interruptions and make the cleaning process more straightforward.

Step 2: Cleaning the Keys and Surface
Start by using the can of compressed air to blow out dust and debris from between the keys. Hold the can at an angle to ensure you reach all areas. This will help dislodge any particles that are stuck between the keys. Next, take a soft-bristled brush to gently sweep away any remaining particles. This helps to remove any dust or debris that the compressed air may have missed. Dampen a microfiber cloth with a small amount of isopropyl alcohol and wipe down the keys and the surface of the keyboard. This will disinfect and clean the surface without damaging the keyboard. Avoid using too much liquid to prevent it from seeping into the keyboard.
Step 3: Deep Cleaning the Inside
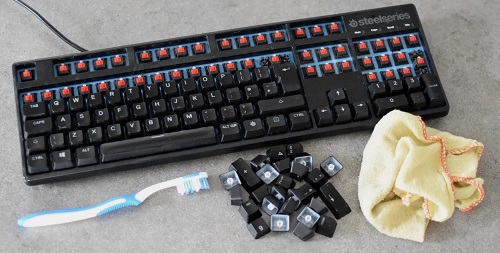
For a thorough clean, you may need to remove the keys. Use a keycap puller or a flat tool to gently pry off each key. Place the keys in a bowl of soapy water and let them soak for a few minutes. While the keys are soaking, use a cotton swab dipped in isopropyl alcohol to clean the areas under the keys. This will help to remove any dirt or grime that has accumulated. After the keys are clean and dry, reattach them to the keyboard. Make sure each key is securely in place before using the keyboard again. This deep cleaning process ensures that your keyboard is thoroughly cleaned and free from any hidden dirt or debris.
How Often Should You Clean Your Keyboard?
The frequency of cleaning your keyboard depends on how often you use it and your environment. For daily users, a light cleaning once a week is recommended to prevent buildup. This can include using compressed air to blow out dust and wiping down the surface with a microfiber cloth. A more thorough cleaning, including removing the keys and deep cleaning the inside, can be done once a month. If you notice any sticky keys or a significant amount of debris, it’s a good indication that your keyboard needs cleaning. Regular cleaning helps to maintain the functionality and appearance of your keyboard, ensuring a better user experience and extending its lifespan.
Tips and Tricks for Keeping Your Keyboard Clean
Avoiding Spills and Crumbs
To keep your keyboard clean, avoid eating or drinking near it. Spills can cause significant damage and crumbs can get lodged under the keys, leading to sticky or unresponsive keys. If you must eat at your desk, consider using a cover or tray to protect your keyboard. This can help to catch any crumbs or spills before they reach the keyboard. Additionally, being mindful of your eating and drinking habits can go a long way in keeping your keyboard clean and functional.
Using Keyboard Covers
Investing in a keyboard cover can help keep dust and debris out. These covers are easy to clean and can be removed and washed regularly. They act as a barrier, preventing crumbs, dust, and spills from reaching your keyboard. Keyboard covers are especially useful if you frequently eat at your desk or have a dusty environment. By using a keyboard cover, you can protect your keyboard from potential damage and reduce the need for frequent cleanings.
Conclusion
Knowing how to clean a keyboard is essential for maintaining both hygiene and functionality. Regular cleaning helps to prevent the buildup of germs and ensures that your keys work smoothly. By following these quick and easy methods, you can keep your keyboard in top condition. Remember to clean it regularly and take precautions to avoid spills and crumbs. With these tips, your keyboard will stay spotless and function perfectly for years to come. A clean keyboard not only improves your typing experience but also extends the lifespan of your device, making it a worthwhile investment of your time.
FAQs
1: Can I use water to clean my keyboard?
It’s not recommended to use water directly on your keyboard. Instead, use isopropyl alcohol, which evaporates quickly and won’t damage your keyboard.
2: What should I do if I spill liquid on my keyboard?
Immediately unplug the keyboard, turn it upside down to drain the liquid, and let it dry completely before using it again. Consider taking it apart for a thorough clean if necessary.
3: How do I clean a mechanical keyboard?
Remove the keycaps and clean them separately. Use compressed air to remove debris and a cotton swab with isopropyl alcohol to clean the switches and board. Reattach the keycaps once everything is dry.
